I just finished a fun project and thought I’d give a brief narrative of the construction process. The client wanted a new desk-top that would sit atop an iron base (client provided the base). He wanted the desk-top made from a single, natural-edged slab, with highly figured wood. If I couldn’t find that, then he wanted the 3 foot X 5 foot desktop made of no more than two, book-matched boards.
So, I started hunting and presenting options. We looked at mesquite and walnut and maple and cherry. Ultimately, the client decided on cherry. As I have mentioned previously, some of the prettiest cherry in the world grows in northwest Pennsylvania. I made a call to Dan Terbovich at Horizon Wood Products in that neck of the woods (literally). Dan was awesome, and went above and beyond in helping me find the perfect pair of boards. He wrapped them up like precious cargo and shipped them to me here in Texas.

Apprentice evaluating the raw lumber
Even in rough form, you can see that the boards have crazy figure. “Figure,” by the way, refers to an unusual grain pattern in wood. This grain pattern is a sort of optical illusion that is variously described as “shimmery,” “iridescent,” “three-dimensional,” or “movement.” It’s really pretty, really rare, and really expensive. For the two of you who want to learn more about this, you can do a google or a google image search of ‘chatoyancy.’ As a final thought on this, you’ll notice that I use figured woods A LOT on my commissions. The reason for this is simple… figured woods are awesome! Any schmuck can go buy a mass-manufactured desk out of inexpensive, boring, whatever-wood. If I’m going to craft something by hand, why not use the best possible materials? It’s sort of a ‘go big or go home,’ or ‘life’s too short to drink cheap beer,’ philosophy.
But I digress… back to the build.
Next step, cutting these, beautiful, pristine boards into desk-sized pieces. I cried a little while doing this.

First cuts. My decrepit Skillsaw proved unequal to the task, and died in a cloud of noxious smoke.

Rough-milled boards, with one ‘straight line rip’ cut on each board
These boards were a bit over 2 inches thick when I got them. They were also 22 inches-24 inches wide. When you start with really wide slabs like these, it is pretty rare that they stay flat. They tend to warp or cup or bow or twist or do something wonky. In this case, the boards had a slight ‘twist’ before I cut them. It was a pretty tame thing, kind of like this. Once I cut them to rough size, however, some serious inner tensions let loose and they turned into Boards Gone Wild (uncensored version). The little twist turned into a frenetic, out of control twist. In lumber, twist is where two diagonal corners of a board curl/warp downward and the two other diagonal corners of the board curl upwards. If your goal is to get a flat board (which it generally is in woodworking), then twist is the last thing you want to see.
So, I moped about it while I sanded the natural edges of the slab with a sanding flap-wheel.

sanding the natural edges with flap wheel

edges sanded
Then, I remembered a woodworking jig that was featured in Fine Woodworking a couple months ago. Some of you might be familiar with Nick Offerman, an actor on Parks and Recreation. Here’s a clip of Dave Letterman gently mocking the article and the jig that I subsequently used on this project (UPDATE 2/2013– CBS took the video down, darn them. Here’s a link to it in Fine Woodworking, but the video itself is dead there too: http://www.finewoodworking.com/item/41363/fine-woodworking-on-the-david-letterman-show)
[youtube]http://www.youtube.com/watch?v=ye85nAzPcy8[/youtube]I guess what I do is kind of dorky, if Dave’s perma-smirk is any indication. C’est la vie.
Ok, so here’s my version of the “Super Kick-Ass Offerman Leveling Jig:”

How to make one face of a really twisted board flat.

close-up of router leveling jig
About 1,000 back and forth passes later, I had flattened one face of each board. Here’s where the twist went:

Mound o’ sawdust

flattened board
After I got one face of each board flat using the jig, I then flattened the opposite faces on my 37 inch drum sander. Then, I jointed the two edges and glued up the boards:

Next steps, sanding. 30 minutes of drum sanding, 30 minutes of belt sanding, 2 hours of sanding through the grits (80, 120, 150, 180) with my Rotex sander. After all this sanding, the figure is really starting to emerge. The boards have gone from 2 1/8 inches thick in the rough to a final thickness of just under 1 1/4 inches thick. That is some really expensive sawdust, by the way. My neighbor is a meat-smoking fanatic, so he jumped on the chance to get 40 pounds of premium cherry sawdust.

desk top after sanding
Last steps of the project are finishing. I called a woodworker I really admire (Dave Diaman @ http://www.diamanwoodcrafters.com/) and asked his opinion on a ‘finishing schedule.’ My goals with this (and with most projects) are not to ‘stain’ the wood, but to let the wood speak and do its thing as naturally as possible. For this project, I wiped on one coat of General Finishes Seal-a-Cell, then sprayed on a coat of thinned dewaxed shellac, then sprayed 4 coats of General Finishes water-based PolyAcrylic. I scuff-sanded between each coat with 600 grit and with a very fine 3M pad.
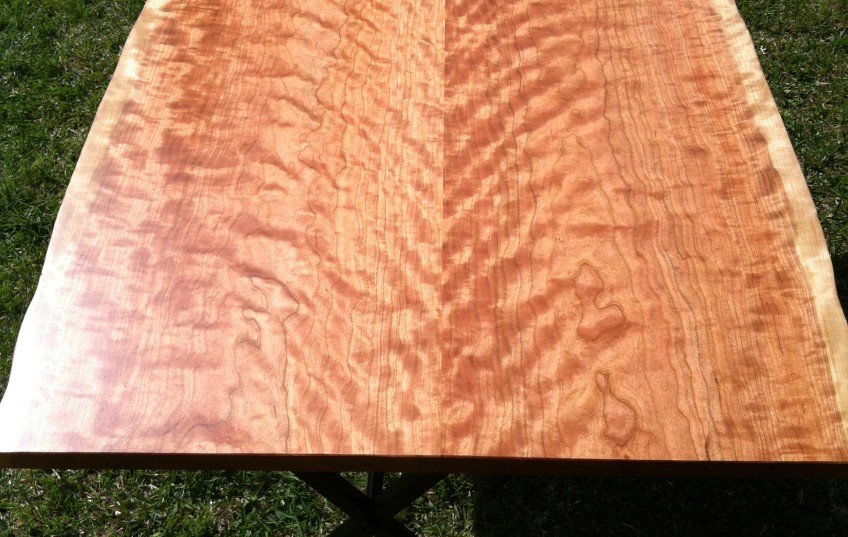
After wiping on the first coat of Seal-a-Cell, I put the desk top out in the sun for a day of ‘sunbathing.’ One of the things I love about cherry is it darkens over time, with about 70% of the darkening happening in the first year. So I gave it a day out in the sun to jump-start the process. The desk seemed to enjoy itself, and asked for a little Steve Miller Band, a little frisbee, and a few beers.

Sunbathing
Then, back into the gloomy shop for some spraying.

Darth Sprayer

Spraying topcoat.

inspecting top coat

close-up of wet finish
I use a low-angle, ‘raking’ light source to inspect the surface. Here, you can see that the sprayed surface has a little texture to it. This levels out as it dries and results in a clear, smooth surface. On my next project, I’m going to increase the air pressure (PSI) on my spray gun slightly to see if it lessens this wet, ‘orange peel’ effect.
I routed some notches in the underside of the desk top to receive the tops of the client’s iron base. With that, the project was complete.
And finally, here’s the finished project:


